-
Dockamon – PyRx 1.2 Release Announcement
We are pleased to announce the release of Dockamon – PyRx 1.2. This release includes changes in PyRx 1.1, 1.2, and PyRx – SMINA. The new features added to Dockamon since the last release include:
-
Pharmacophore Modeling: Construct and visualize pharmacophore models with precision. Dockamon tools support model building, validation, and structural matching, ensuring you can effectively analyze key molecular interactions and identify new drug candidates.
-
3D-QSAR Modeling: Develop and validate quantitative structure-activity relationship (QSAR) models in 3D to predict and enhance biological activity. Visualization tools allow in-depth inspection and interpretation of QSAR results, helping guide medicinal chemistry decisions.
-
Alignment Tools: Perform ligand alignment via multiple advanced methods to ensure accurate comparison and modeling. Dockamon alignment features allow you to overlay and contrast structures easily, improving model reliability.
-
Molecular Docking: Perform molecular docking using AutoDock Vina with an easy to use & modern user interface.
-
Docking Result Analysis: Easily analyze docking results using the Pose Viewer or Docking Results Table:
-
Pose Viewer: Examine the poses of a docked ligand with 3D and 2D interactions.
-
Docking Results Table: Analyze results of virtual screening or single ligand docking with predefined filters and automatic re-scoring options.
-
-
Binding Site Detection: Perform bind site detection on proteins using LIGSITE or Convex Hull algorithms to automatically detect possible binding pockets in a protein structure.
-
Scoring & Consensus Scoring: Score docked poses using a variety of scoring functions including machine learning scoring function (RF-Score V2). Combine multiple scoring functions with adjustable weights to obtain a comprehensive evaluation of docked poses.
-
-
PyRx – SMINA Release Announcement
We are pleased to announce the release of a new product called PyRx – SMINA. This new product includes an option to select SMINA as a docking software for Vina Wizard, as shown in the image below: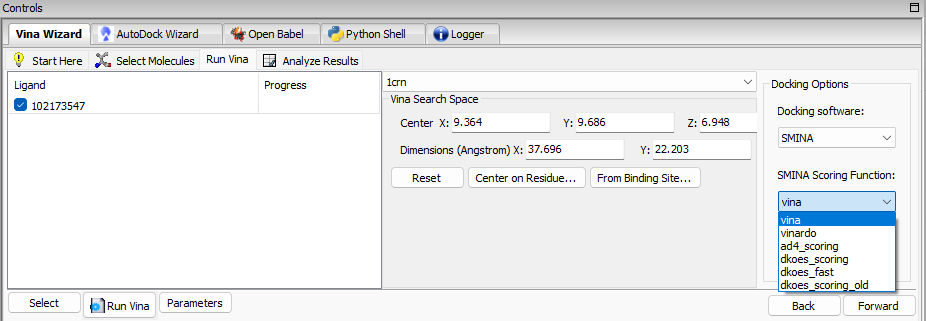 SMINA is a fork of AutoDock Vina enhanced with custom scoring functions and extended options for pose generation.
If you have a previous version of PyRx installed and have updated it, please remove C:\Users\.PyRx_workspace\update folder before starting PyRx – SMINA. You can order PyRx – SMINA using the links on the Home page or by visiting FastSpring Checkout.
SMINA is a fork of AutoDock Vina enhanced with custom scoring functions and extended options for pose generation.
If you have a previous version of PyRx installed and have updated it, please remove C:\Users\.PyRx_workspace\update folder before starting PyRx – SMINA. You can order PyRx – SMINA using the links on the Home page or by visiting FastSpring Checkout. -
PyRx 1.2 Release Announcement
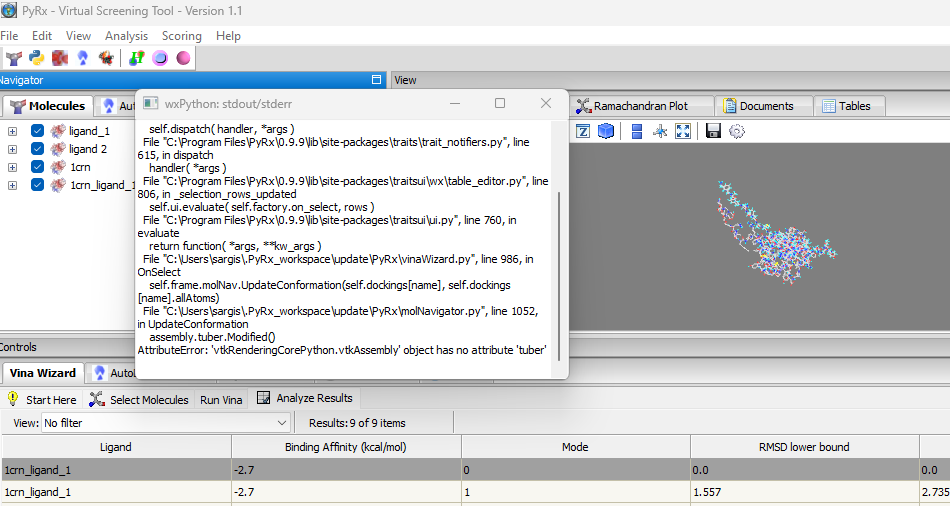
We are pleased to announce the release of PyRx 1.2. The following are new features included in this release:- Fix for AttributeError in PyRx: “vtkAssembly object has no attribute ‘tuber’. This would happen when the number of atoms on ligand is > 200.
- Automatic Binding Site Detection: a method for automatically detecting possible binding sites in a given macromolecule (Analysis->Detect Binding Sites). Automatic binding site detection is useful for docking in cases where the binding site is not known. The method is from the DeepChem package, which is considered useful for preliminary detection of binding sites in a protein structure. Is it based on the convex hull method:
Saberi Fathi SM, Tuszynski JA. A simple method for finding a protein’s ligand-binding pockets. BMC Struct Biol. 2014 Jul 19;14:18. doi: 10.1186/1472-6807-14-18. PMID: 25038637; PMCID: PMC4112621.
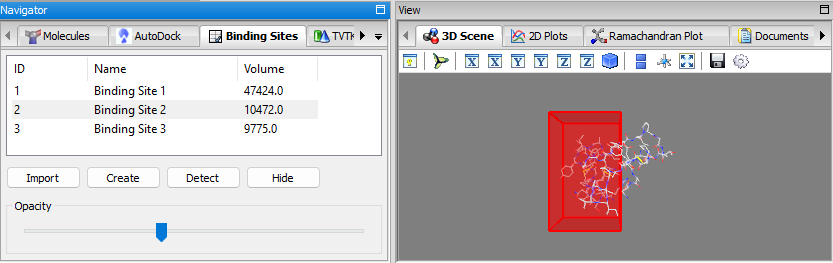
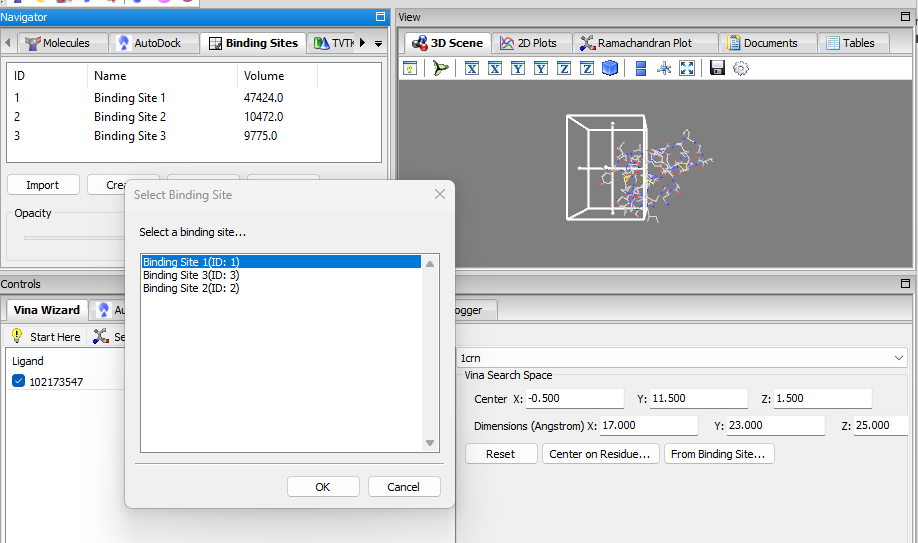
- Binding Sites Panel: a panel for managing binding sites (i.e. docking grid boxes) and for displaying the detected binding sites, visualization in 3D, manual creation, importing/exporting, etc. the When binding sites are detected using the detect binding sites feature mentioned, the binding sites are added to the list of this panel. When a binding site is selected, it will be displayed in the 3D-Viewer; the opacity can be adjusted via the slider. It is also possible to manually create a binding site and add it to the list via the create button. The binding sites can be exported/imported as well.
In the Vina wizard, when setting the grid box position/size, the user can select a per-detected/created binding site directly as the docking grid box via the From Binding Site … button.
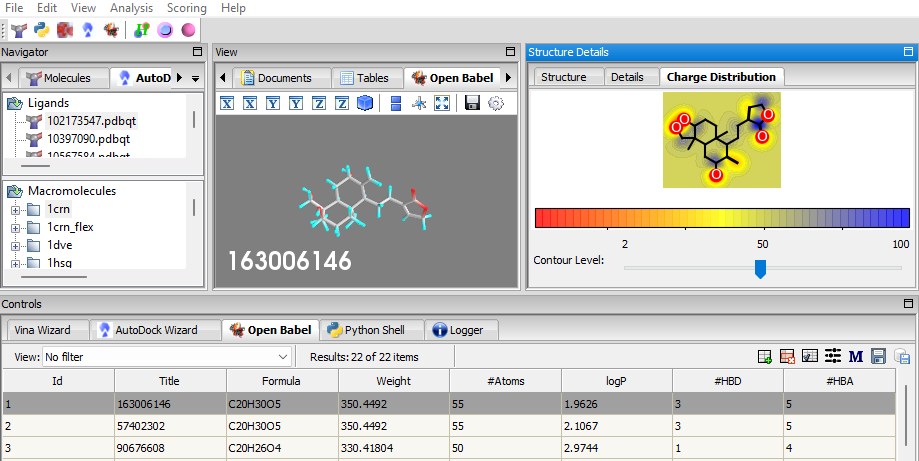
- Charge Distribution Visualization: When a ligand is selected from the OpenBabel table, the charge distribution of the atoms is displayed in a new tab in the Structure Details Panel named Charge Distribution.
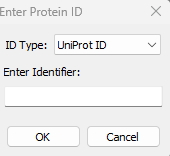
- AlphaFold Database structures fetching: This new feature is available via File->AlphaFold Database… menu. Users can download the structure either by UniProt ID or AlphaFold ID. For example: UniProt IDs: P00734, P02768. AlphaFold IDs: AF-Q16539-F1, AF-P04637-F1.
- Fix for AttributeError in PyRx: “vtkAssembly object has no attribute ‘tuber’. This would happen when the number of atoms on ligand is > 200.
-
Fix for AttributeError in PyRx: “vtkAssembly object has no attribute ‘tuber’”
PyRx is designed to dock small molecule libraries, and we welcome all users to push it to the limit of larger molecules. Amit Sharma from Washington University in St. Louis recently reported a PyRx issue that involved docking ligands with more than 200 atoms. Omar Al-Attraqchi from CrescentSilico was able to fix this bug quickly, and we are providing this fix via Help > Check for Updates… Enjoy!
-
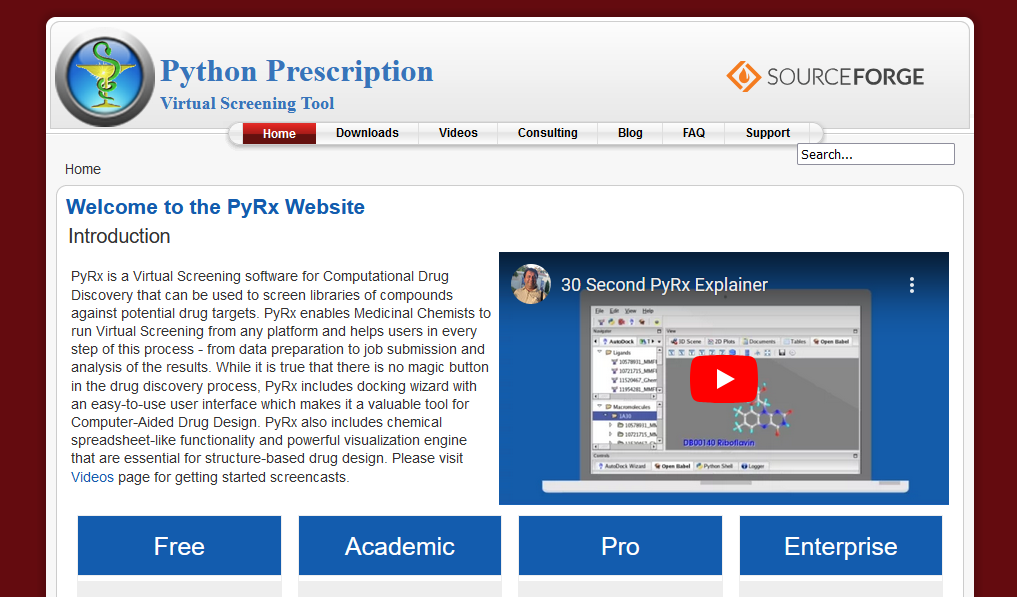
Updated PyRx Website
We have updated the PyRx website. Thanks to Joomla to WordPress plugin. Please open a support ticket if you find any broken links or missing information.
-
PyRx 1.1 Release Announcement
We are pleased to announce the release of PyRx 1.1. The following are new features included in this release:
- Machine Learning Scoring Function: Integrate the powerful RF-Score V2 machine learning scoring function to accurately assess docked poses or imported
- ADME Radar Chart: Create customizable radar charts that depict ADME-related properties for OpenBabel molecules, offering a holistic view of their molecules binding affinity.
- 2D-Structure Visualization: Explore the 2D-structure of the OpenBabel molecules along with a list of the associated properties and pharmacokinetic profiles
- Quick Filter: Simplify data analysis with easy-to-use min/max filtering options for docking results or OpenBabel molecules.
- Interactive Plotting: Customizable and interactive scatter plot and histogram for OpenBabel molecules
- Automatic Grid Box Centering: Optimize docking grid box positioning effortlessly by centering on a specific residue of the receptor. Enhance precision in molecular docking studies.
- Ramachandran Plot: Assess protein structure with an interactive and customizable Ramachandran plot. Gain valuable insights into the conformational quality of protein residues.
- Protein Structure Insights: Perform analyses on protein structure, including residue-type distribution, heteroatoms exploration, and more.
Features Details:
* Machine Learning Scoring Function: PyRx offers scoring of ligands using the RF-Score V2 scoring function, which is a machine learning scoring function with signficantly higher binding affinity prediction accuracy compared to the classical AutoDock and AutoDock Vina scoring functions. You can score docked poses from the results of AutoDock/AutoDock Vina docking process or ligands imported in the OpenBabel table. To score ligands (i.e. estimate binding affinity) towards a macromolecule using the RF-Score V2 scoring function, from the Scoring Menu, click Score Ligands, the score ligands dialogue will be opened.

Select the macromolecule (you can choose from molecules in Molecules Navigator) and the table of ligands to score. You can exclude heteroatoms from the macromolecule in the scoring process by checking the Exclude heteroatoms from macromolecule, which can be useful to exclude ligand and solvent atoms if present. The path to the “rf-score-vs.exe” executable should be also specified. After clicking Ok, the ligands will be scored and the result will be added as a column to the corresponding table. The values are the pK (the -log of the activity) calculated by the RF-Score V2 scoring function. Higher values indicate higher estimated activity.

* When selecting a molecule in the Open Babel widget, you can now see the 2D structure of the molecule.

Click the Details tab for the radar chart showing Molecular Weight, number of hydrogen bond donors (HBD), number of rotatable bonds (#Rots), octanol-water partition coefficient (LogP), and the number of hydrogen bond acceptors (HBA) in blue. The light green area shows where these values satisfy the Lipinski Rule of Five. You can also click on HBDs or HBAs checkboxes to highlight in Open Babel 3D viewer hydrogen bond donors in red and hydrogen bond acceptors in blue.

* Quick Filter: To filter the molecules table, click on the Quick Filter icon in the desired table (OpenBabel Tab or Autodock/Autodock Vina Analyze Results Tab). The Quick Filter dialogue shows the columns available for filtering. For each column you can check the Enable checkbox to include the column in the filtering process. Use the min/max sliders to determine the desired range of values. The min/max values are inclusive and the enabled filters are applied using AND operator. The results are applied directly on the table. When closing the Quick Filter dialogue, the table will be reset.

* Interactive Plotting: Click on the 2D-Plots tab to show scatter/histogram plots. Select the axes columns (X/Y for scatter plot, X for histogram) and the values of the OpenBabel molecules will be plotted. Click on the settings icon to customize the plot options such as marker color, size, etc. In the scatter plot, you can click on a point to select the corresponding molecule.


* Automatic Grid Centering: When setting up the grid box for docking (AutoGrid/Autodock Vina), you can center the grid on a residue of the selected macromolecule for the docking process. Click on the “Center on Residue” button, then select the desired residue and click OK, the grid box center will be set to the coordinates of the selected residue.

* Ramachandran Plot: To generate a Ramachandran plot for a protein molecule, from the Analysis menu, click Ramachandran Plot, then select the desired macromolecule (you can choose from molecules in Molecules Navigator). The Ramachandran plot will be generated for the selected protein. You can view the plot in the Ramachandran Plot tab. Each point represent a residue, you can click on a point to display the residue name and angles values.

* Protein Structure Insights: You view a report of a protein structure details, from the Analysis menu, click Protein Structure Details, then select the desired macromolecule (you can choose from molecules in Molecules Navigator). A result of the analysis will be displayed containing general information about the protein structure. Also, chain information, standard residue distribution, heteroatoms residues and water residues information will be displayed.


PyRx 1.1 New Features Video
-
Dockamon – PyRx 1.0 Release Announcement
We are pleased to announce the release of Dockamon – PyRx 1.0. This is a work in collaboration with CrescentSilico. Dockamon – PyRx is a structure-based drug design software package containing two integrated software programs: Dockamon and PyRx. Dockamon is software for scoring ligand docked poses using machine learning scoring functions. PyRx is molecular docking and virtual screening software. Major features of Dockamon include:
- Ligands Scoring: Score docked poses using a machine learning scoring function including RF-Score V2 and SVM-Score.
- Consensus Scoring: Combine scores from more than one scoring function to achieve better predictions.
- Protein-Ligand Interactions: Publication quality 2D and 3D interactive visualization of protein-ligand interactions. Customizable interactions options.
- Protein and Ligand Preparation: Prepare protein structures and ligands for docking, scoring or other molecular modeling tasks.
- Filtering & Substructure Matching: SMARTS and SMILES pattern substructure search, numerical and text-based filtering of the data.
- Other Features: Additional functionalities, including chemical spreadsheet capabilities, protein structure management, descriptor calculations, and conformer generation.

Please use the link below to order Dockamon – PyRx. Academic and Pro are the same version. Academic version is discounted for academics and nonprofits users.
https://crescentsilico.wordpress.com/dockamon-pyrx/ -
PyRx 1.0 Release Announcement
We are pleased to announce the release of PyRx 1.0. PyRx is an award winning virtual screening tool used and loved by scientists worldwide. The following are new features included in this release:
-
Added similarity search for the Vina and AutoDock Wizards to find similar compounds in PubChem. You can now right-click on any of the rows under the Analyze Results tab and select Find Similars in PubChem … This searches PubChem using Similarity search, downloads 3D conformers matching search results and opens it with the Open Babel widget.

-
Double click on any of the rows in the Open Babel widget to open PubChem in the web browser matching the Title of the compound. For instance:
https://pubchem.ncbi.nlm.nih.gov/#query=C20H30O5. -
On the Vina Analyze Results tab users can now save SMILES strings:

-
For Vina Wizard, on the Run Vina page, when you click on Forward button, PyRx checks to see if there is a Vina output file already present (out.pdbqt) for each ligand. If you have already run Vina, it won’t run a new Vina job again. It instead adds the output to the Analyze Results page. This is useful when you have run Vina for a large number of ligands and would like to add additional ligands without running Vina for every ligand. Users can force PyRx to run Vina for each ligand by pressing Run Vina button.

-
When screening a large number of ligands, you can now limit how many ligands to display in the Analyze Results page for Vina Wizard. This is for computers that don’t have enough memory to load all docking results at once. Use PyRx > Edit > Preferences… and check Limit Docking for GUI Analysis. You can also enter a number of top results to display. PyRx can now sort all results by predicted binding affinity and display only top results in the GUI to avoid running out of memory.
For screening large libraries of ligands, it is best to use a High-Performance Computing (HPC) cluster with many CPU cores and have PyRx run on a server with large memory (RAM). If you don’t have a server with large memory, this option can be used to limit how many Vina outputs PyRx loads into memory.

The list of changes for all previous PyRx releases is available on our Blog. Please use our ticketing system to report bugs or request new features – https://sourceforge.net/p/pyrx/tickets. We hope you will enjoy this new version of PyRx.
-

PyRx – Python Prescription
Virtual Screening Tool